Scope
Integrating Swagger into your Spring Boot application enhances API usability and accessibility by generating dynamic, interactive documentation for your endpoints.
Swagger, a powerful tool from the OpenAPI ecosystem, provides a user-friendly interface—Swagger UI—that allows developers and stakeholders to visualize, explore, and test API operations directly from the browser. By incorporating Swagger into your application, you not only improve development efficiency and collaboration but also ensure your API is well-documented, facilitating easier onboarding for new developers and promoting seamless integration with third-party services.
Swagger Configuration
Here’s how you can configure Swagger UI for your Spring Boot API.
Add Necessary Dependencies
In your pom.xml, include the following dependencies to integrate Springdoc OpenAPI:
For SpringBoot 2.7:
<dependency>
    <groupId>org.springdoc</groupId>
    <artifactId>springdoc-openapi-ui</artifactId>
    <version>1.6.11</version>
</dependency>
<dependency>
    <groupId>org.springdoc</groupId>
    <artifactId>springdoc-openapi-common</artifactId>
    <version>1.6.11</version>
</dependency>
For SpringBoot 3.2:
<dependency>
    <groupId>org.springdoc</groupId>
    <artifactId>springdoc-openapi-starter-webmvc-ui</artifactId>
    <version>2.3.0</version>
</dependency>
For any other SpringBoot version please check the related compatibility.
Configure OpenAPI Bean
Define a Spring Bean to set up the OpenAPI configuration, customizing details such as the API’s title, description, version, and licensing information:
@Bean
public OpenAPI openAPI() {
    return new OpenAPI()
            .info(new Info()
                    .title("Test API specs")
                    .summary("API of available services for the Test application.")
                    .description("API of available services for the Test application.")
                    .version(buildProperties.getVersion())
                    .license(new License().name("Apache 2.0")
                            .url("http://springdoc.org")))
            .externalDocs(new ExternalDocumentation()
                    .description("Test API Documentation")
                    .url("https://testdocumentationurl.nodalpoint.com"));
}
Handle Reverse Proxy Configurations
If your application operates behind a reverse proxy that modifies URLs, implement the following steps:
Proxy Header Configuration:
Ensure the reverse proxy adds the X-Forwarded-Prefix header with the appropriate path prefix.
Application Properties:
In application.properties, set the following properties to manage forwarded headers and control Swagger UI availability:
#Swagger
####Allow SpringBoot to handle X-Forward-* headers. This allows SpringDoc to work behind reverse-proxies
server.forward-headers-strategy=framework####Disable SpringDoc by default. Override in profile properties when required
springdoc.api-docs.enabled=true
springdoc.swagger-ui.enabled=true####Disable SpringDoc's "Try It Out" capability
springdoc.swagger-ui.supportedSubmitMethods=
Register Forwarded Header Filter:
Create a Spring Bean to process the X-Forwarded headers:
@Bean
ForwardedHeaderFilter forwardedHeaderFilter() {
    return new ForwardedHeaderFilter();
}
Annotate Controllers for Enhanced Documentation
Utilize specific annotations to enrich your API documentation:
Class-Level Annotation:
@Tag(name = "Your Tag Name", description = "Description of the tag")Method-Level Annotations:
@Operation(summary = "Summary of the operation")
@ApiResponses(value = {
    @ApiResponse(responseCode = "200", description = "Successful operation"),
    @ApiResponse(responseCode = "400", description = "Invalid request", content = @Content),
    @ApiResponse(responseCode = "401", description = "Unauthorized", content = @Content),
    @ApiResponse(responseCode = "403", description = "Forbidden", content = @Content),
    @ApiResponse(responseCode = "500", description = "Internal Server Error", content = @Content)
})
Parameter Annotations:
@Parameter(description = "Description of the parameter")For complex object parameters use:
@ParameterObjectExample: Annotated Controller Method
Here’s how to apply these annotations to a GET endpoint:
@Operation(summary = "Get a list of publication reports")
@ApiResponses(value = {
    @ApiResponse(responseCode = "200", description = "success"),
    @ApiResponse(responseCode = "400", description = "Invalid request",
            content = @Content),
    @ApiResponse(responseCode = "401", description = "UNAUTHORIZED",
            content = @Content),
    @ApiResponse(responseCode = "403", description = "Forbidden",
            content = @Content),
    @ApiResponse(responseCode = "500", description = "Internal/Unhandled Exception",
            content = @Content)
})
@GetMapping(path = "/internal/pub_reports", produces = MediaType.APPLICATION_JSON_VALUE)
public ResponseEntity<Page<SearchReports>> getPublicationReports(
        @Parameter(description = "A list of codes for the subject of the report",
                array = @ArraySchema(schema = @Schema(type = "string", allowableValues = {"A", "B", "C"})))
        @RequestParam(value = "subjectCode", required = false) Optional<List<String>> subjectCodes,
        @Parameter(description = "A list of status codes for the report status",
                array = @ArraySchema(schema = @Schema(type = "string", allowableValues = {"DIST", "OBSL", "SPRS", "UPLD"})))
        @RequestParam(value = "reportStatusCode", required = false) Optional<List<String>> reportStatusCodes,
        @Parameter(description = "A list of IDs for the ID of the participant of the report")
        @RequestParam(value = "participantId", required = false) Optional<List<String>> marketParticipantIds,
        @Parameter(description = "Report period start date - from value")
        @RequestParam(value = "periodStartDateFrom", required = false) Optional<String> periodStartDateFrom,
        @Parameter(description = "Report period start date - to value")
        @RequestParam(value = "periodStartDateTo", required = false) Optional<String> periodStartDateTo,
        @Parameter(description = "Report period end date - from value")
        @RequestParam(value = "periodEndDateFrom", required = false) Optional<String> periodEndDateFrom,
        @Parameter(description = "Report period end date - to value")
        @RequestParam(value = "periodEndDateTo", required = false) Optional<String> periodEndDateTo,
        @Parameter(description = "User that distributed the report")
        @RequestParam(value = "distributedBy", required = false) Optional<String> distributedBy,
        @Parameter(description = "Indicates if the report has been downloaded by the participant",
                schema = @Schema(type = "boolean", allowableValues = {"false", "true"}))
        @RequestParam(value = "isDownloaded", required = false) Optional<Boolean> isDownloaded,
        Locale locale,
        @ParameterObject
        @PageableDefault(size = 200) @SortDefault(sort = "createdOn", direction = Sort.Direction.DESC) Pageable pageable,
        HttpServletRequest httpServletRequest) {

    // Check if user has been authenticated
    Principal principal = httpServletRequest.getUserPrincipal();
    if (principal == null) {
        return ResponseEntity.status(HttpStatus.UNAUTHORIZED).build();
    }

    Page res = internalReportService.searchReports(subjectCodes,
                                                    reportStatusCodes,
                                                    marketParticipantIds,
                                                    periodStartDateFrom,
                                                    periodStartDateTo,
                                                    periodEndDateFrom,
                                                    periodEndDateTo,
                                                    distributedBy,
                                                    isDownloaded,
                                                    pageable);
    return ResponseEntity.ok().body(res);
}
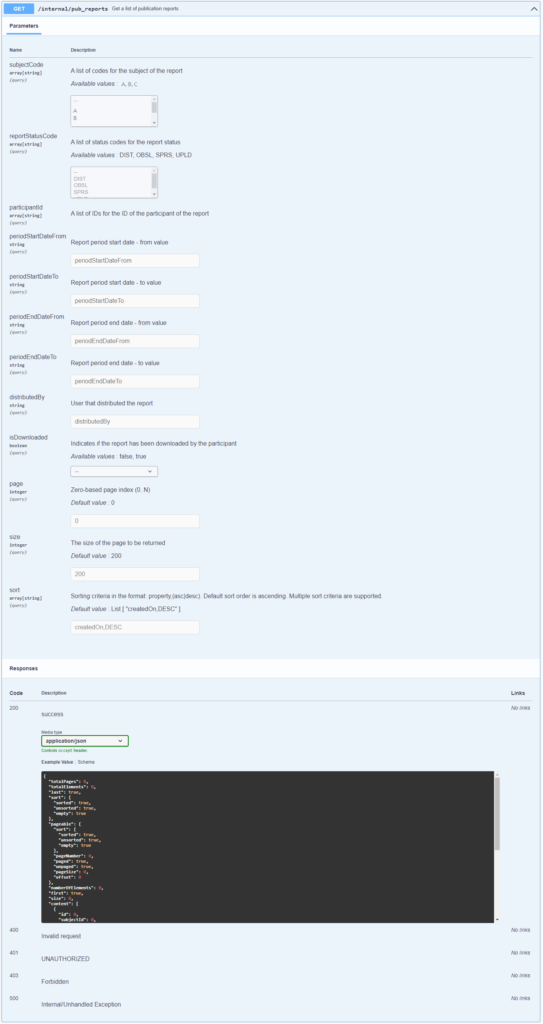
The above will create the following entry in Swagger (URL will be …/app-context/swagger-ui.html):

Note that in @Parameter, we can use multiple tags if required to better define the parameter. Use array = @ArraySchema when using a list parameter. Use schema = @Schema with allowableValues when need to define specific allowed values.
An example for @Tag, as added in the same application:
@RestController
@Slf4j
@Transactional
@RequestMapping("/internal/utils")
@Tag(name = "Internal Utils Resource", description = "Utils used from internal portal")
public class InternalUtilsResource {
...
By following these steps, you can effectively integrate and configure Swagger UI in your Spring Boot application, providing comprehensive and interactive API documentation for users and developers.
Cheers!
Related sources
- https://swagger.io/docs/open-source-tools/swagger-ui/usage/configuration/
- https://stackoverflow.com/questions/43642179/configuring-swagger-ui-with-spring-boot
- https://medium.com/%40samuelgbenga972/basic-swagger-setup-for-spring-boot-application-755adc6e5a9b
- https://blog.devops.dev/configuring-swagger-in-spring-boot-application-017b14888d7a
- https://www.youtube.com/watch?v=JAm3dOD_dwQ
- Deterministic Pagination in SpringBoot with Pageable and Custom PK Sorting - December 8, 2025
- SpringBoot integration with ElasticSearch - January 14, 2025
- Configure SwaggerUI in a SpringBoot application - December 6, 2024

